I just put another video up showing the new Heartfelt stamp and die collection - Coffee Talk.
https://youtu.be/r2daZAIGIk0
Thank you for watching! Please don't forget to like and subscribe to my YouTube channel!

Crafts of many colors all vivid to my mind. A very joyous place. * Art Dolls, cross stitching, polymer clay, beads, crochet - lots of colorful fun.
Thursday, December 17, 2015
Happy December!
Hi - almost Christmas - do you believe it's only one week and a day away? I've just uploaded a video showing my December Daily for this year. For those who don't know what a December Daily is - it's a mini photo journal depicting life in the month of December. You can really make small journals for each month or for any event that you want to document. Some people only put photos in their journals, others only writings or some do both. I intend to do both - as soon as I can get some small photos printed that is...
The youtube video I posted will show you the pages and decorations that I used:
https://youtu.be/-re5NB20PZs
Thank you for watching - Have a crafty, happy day! K
The youtube video I posted will show you the pages and decorations that I used:
https://youtu.be/-re5NB20PZs
Thank you for watching - Have a crafty, happy day! K
Monday, December 14, 2015
Tuesday, December 8, 2015
Christmas time - Christmas crafts and gifts
Good morning again! If you are in the northeastern part of the United States - upstate New York really, you would be having a relatively warm December. There was a heavy frost outside but they say the Hi may be 45F - wow! I actually like the cold - especially when I can stay inside and craft. This is a warm and cozy time inside and a crisp and fun time outside. One thing about the cold temperatures outside is that most of the creepy crawly things are at rest and not bothering anyone. LOL.
I've been working on a few gifts lately. I also just finished my Christmas cards and they are ready to mail - woohoo! Of course I didn't take photos of the Christmas cards but they came out nicely and I like them. This year I did some hand stamping and coloring. I kept it simple and manageable. That last part is difficult for me.
Today's blog shows a photo journal for people who like to be outdoors - exploring the adventure of life and nature.

Cover

The cover flips up and shows the spiral bound photo journal.

Hand made envelope in a tuck spot to place notes about the day or to hold other small photos.

Tree embossed tag that is also a photo mat.

flower embossed tag/photo mat.

All the flat pages are for photo placement and note writing. The bottom of this photo shows a "waterfall" photo album that is attached to the back cover. There is room for over 20 photos just in the waterfall section. Its held together with a gold ribbon and topped by another hand made envelope.

This is just a view of the waterfall album untied. You can see the spiral bind of the book - it actually slips out of it's cover for ease of filling and viewing. There is a pocket in the inside back cover of the book that holds the spiral bound back flap.
I used a very old paper stack for this album. It was a lot of fun. I hope you enjoyed looking and please feel free to ask me any questions you may have. Thank you!
Blessings!
Kelly
Final part of the Witch art doll
https://www.youtube.com/watch?v=PdLOOw1EbhQ
The link above is to my last installment on the last doll I created. (photo below) I kind of rushed through this process - at least for me. I generally take a lot more time. I think the three parts are good for a general overview of my process - at least for the top part of a cloth doll. I hope that something in the video inspired that light bulb moment when you thought - aha! I can do....
I'm hoping to post a little more frequently. Life has been unexpected again as it tends to be - so I do things when I can. More in a little bit - I have a few Christmas things that I'd like to show...
Blessings -
Kelly

Surprise! Not a witch after all...
Friday, November 6, 2015
Thursday, August 20, 2015
Newest Heartfelt Creations collection - Farmer's Market
I received my new Heartfelt Creations collection last weekend and am sharing it via an unboxing in a YouTube video. Please follow this link to my sharing of the package.
http://youtu.be/cmQlInOFlyw
I would sincerely appreciate it if you would like, share and especially subscribe to my channel. I am truly enjoying sharing my time with you. Thanks for watching and if you have comments or questions on the package or the video please leave them in the comments section on the video on YouTube and I will do my very best to answer the questions. As always - thank you so much for stopping by my blog and for watching my newest sharing from Heartfelt Creations. (I am in no way affiliated with the company and all products that I own are from my own personal purchases.)
It's incredibly hot and humid here in upstate NY and I am warm even with my air conditioners running and a nice ICE cold glass of water to drink. I hope that where ever you are; you have a creatively inspired day!
Tuesday, August 4, 2015
Two new projects using the Heartfelt Creations Peacock stamps and dies!
Hello! Happy mid-summer! Hope this has been a wonderful summer for you. I've been having a fairly busy summer myself. I have taken some time out though to work on a few projects and create a couple of videos on YouTube. The link to the Peacock altered box and tassel is below.
Thank you so much for taking the time to check my blog and I hope that you will follow the link to my videos. If you appreciate the video please click the like button and share the link with your friends - if you decide to subscribe to my channel that would be truly exciting to me! I will take the time later to upload a couple of photos of the projects.
Have a lovely day! Link:
https://www.youtube.com/watch?v=pa2XGStnJdQ
Saturday, July 25, 2015
Sunday, July 19, 2015
Mike's new book of poetry and stories
Good morning! I hope today finds you well and happy. Great news! My son Mike has his new book ready to publish. He needs some help to fund the process and is asking for our help. Here is a link to his new Kick Starter project. In it he's filmed a short video introduction. I'd love and appreciate it if you could check it out and maybe add your support to his passion. Thank you for taking the time - I know how valuable it is. Blessings to you.
https://www.kickstarter.com/projects/mikeford/seekers-of-the-light?ref=hero_thanks
https://www.kickstarter.com/projects/mikeford/seekers-of-the-light?ref=hero_thanks
Tuesday, May 26, 2015
Happy Doll Day!
Yesterday was Memorial Day - a day that we take the time to think of and thank the soldiers and families that sacrificed much to keep our nation free. God bless them.
I spent the later part of the day doing something that I have not done in years - making a doll. Granted it is a pretty simple doll - but I had a great time making her and was very thankful to find that the old skills are not gone - they've just been dormant.
The pattern I took inspiration from is from a Tilda's Studio book, copy right 2011 I think. It's a pattern called cupcake angel. These type of dolls have been around a long time and similar patterns can be found all over the web. I just happen to be a book junkie so I have had this book a few years. Part of the reason for making this doll is that my son-in-law wants me to make physical dolls out of some of his line drawings. Guess I need to practice a little first. Another reason is I have way too much stuff in my stash of doll making materials and I need to use them - thus - another chapter in doll making may just start.
Here are some pictures of the making of Violet - I hope you enjoy them. I may just do a video of my doll making process at some point - if I can figure out how to shorten the length of the video - it would be a mini series at this point - well maybe even a saga - and we don't need that.
I hope you enjoyed this quick look. Doll making is a lot of fun and you never know what you're going to get when you're finished - kind of like a box of chocolates.
I spent the later part of the day doing something that I have not done in years - making a doll. Granted it is a pretty simple doll - but I had a great time making her and was very thankful to find that the old skills are not gone - they've just been dormant.
The pattern I took inspiration from is from a Tilda's Studio book, copy right 2011 I think. It's a pattern called cupcake angel. These type of dolls have been around a long time and similar patterns can be found all over the web. I just happen to be a book junkie so I have had this book a few years. Part of the reason for making this doll is that my son-in-law wants me to make physical dolls out of some of his line drawings. Guess I need to practice a little first. Another reason is I have way too much stuff in my stash of doll making materials and I need to use them - thus - another chapter in doll making may just start.
Here are some pictures of the making of Violet - I hope you enjoy them. I may just do a video of my doll making process at some point - if I can figure out how to shorten the length of the video - it would be a mini series at this point - well maybe even a saga - and we don't need that.
 |
| Pattern was traced onto the muslin, sewn and then cut out with pinking shears (aids in the release of tension on the curved areas of the material) |
 |
| turned right side out |
 |
| stuffed |
 |
| slit for stuffing sewn closed on the back |
 |
| Don't you love this little travel sized iron? It works very well I'm ironing the bottom trim material for pleating |
 |
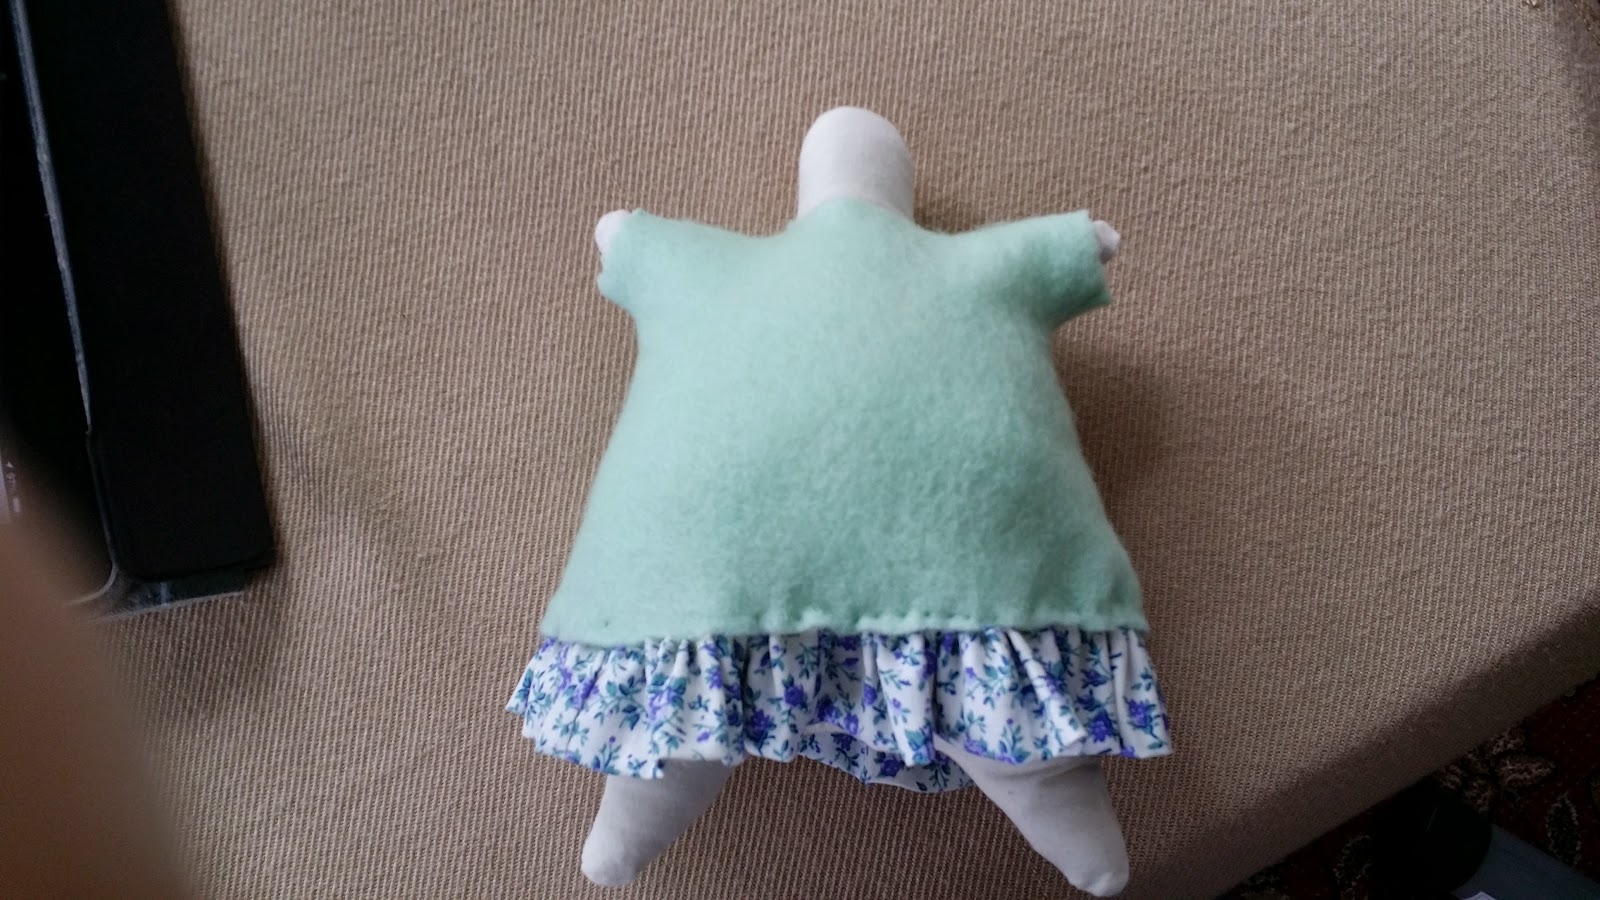
| doll dress top is sea-foam green felt and the hand pleated material is pinned on for attachment by more hand sewing |
 |
| It fits |
 |
| More trim and a few pearls are added for decoration |
 |
| hair and face are added - she's almost there |
 |
| Meet Violet - she doesn't have wings - so she's not an Angel. |
Have a spectacular day! K
Strawberry Rhubarb Jam and a Lemon Meringue Pie - Happy May!
Another post today! (And still one more to follow - busy weekend)
Earlier in the week, I made up some strawberry rhubarb jam. I had to buy the strawberries but the good news is that they are fresh and plentiful right now. The rhubarb I grow myself and it's looking good although it's been a very dry spring here in upstate NY. A few pictures:
This past week found me in the kitchen a couple of times. My daughter's fiance, Calvin had a birthday last week and I offered to make his birthday "cake". Calvin isn't really a "cake" eater so instead I made him a lemon meringue pie from scratch. I'm getting into whole foods and doing my own making and I'm enjoying myself - kind of going back to my roots and doing things the way I used to do them many years ago. Feels good. Here are some pictures of the pie:
 |
| Cooking the Lemon |
 |
| added to the baked pie shell |
 |
| Meringue is spread on pie |
 |
| Ready to eat! |
 |
| This is the recipe I used from allrecipes.com I forgot to add the butter - but I've never used butter in Lemon Meringue and it came out just fine without it. |
Earlier in the week, I made up some strawberry rhubarb jam. I had to buy the strawberries but the good news is that they are fresh and plentiful right now. The rhubarb I grow myself and it's looking good although it's been a very dry spring here in upstate NY. A few pictures:
 |
| Freshly cleaned and cut fruit ready to cook. |
 |
| Cooking enough to release juices |
 |
| Adding sugar - I think 4 cups in my case |
 |
| Continue cooking to melt sugar and juices together |
 |
| See the bubbling? That's the foam starting this needs to be skimmed off |
 |
| This is what "skimmed foam" looks like - discard it |
 |
| Cook a little more - keep stirring |
 |
| I turn the heat of and stir in a little nutmeg, cinnamon (not shown) and a teaspoon of my homemade vanilla |
 |
| ready to refrigerate and enjoy |
I'm enjoying this with my morning greek yogurt and granola - a tablespoon of this mixed in is oh so very good!
I hope that you are living a life that is full of the things that make you happy. k
Jacquelyn's Aquaponics project -
Good morning! I hope this finds you well and doing what you enjoy. My granddaughter, Jacquelyn, came over this weekend and among other things, we worked on an aquaponics system for a school project. This project stems from one of our visits to Disney World where we went on the "Behind the Seeds" tour and saw first hand how Disney portrays "Living with the Land". It is fascinating and I highly recommend it - so very inspiring - especially to young minds. Anyway - here are a few photos and I uploaded a video of the experiment to my Kelly Bell YouTube channel.
https://www.youtube.com/watch?v=fO_3X_VUlxE&feature=player_detailpage
I hope this brings you to it if you would like to see the process we followed. Our thanks to Vinil Ratnakaran for his video using a 5 gallon water jug. We decided to go even smaller for a school experiment and use a 2 liter Soda bottle.
materials:
2 liter soda bottle - cap and label removed
3 paint stir sticks (free from Home depot and re-used)
zip ties
Crop-a-dile hole punch - a dremel or a drill would work for the stir sticks hole punch is plenty for the bottle
Plastic cap from a bottle of salad dressing - with several holes drilled into it - we made many more holes than the ones shown in the video as the system didn't drain fast enough to prevent overflow - after additional holes it was perfect. (Initially we used a hammer and a nail to make the holes but I found my dremel and it went much smoother - although a hammer and nail work)
Small fountain water pump
aquarium tubing
aquarium gravel - I found out later that the kind we used may raise the PH level and harm plant growth - clay pellets or regular small gravel may be better.
Black spray paint - Jacquelyn explains why in the video
duct tape - can be any color - again - Jacquelyn explains it in the video.
scissors to cut the bottle
Hot glue gun to attach the salad dressing cap inside the bottle top for drainage in the plant area
T-square if you want the holes to be perfect. (We used it on the first stick - then we used a white charcoal pencil to mark the rest from the first one used as a template.)
I think that was it - if you have questions just ask and we will try to answer them.
Enjoy your day! K
https://www.youtube.com/watch?v=fO_3X_VUlxE&feature=player_detailpage
I hope this brings you to it if you would like to see the process we followed. Our thanks to Vinil Ratnakaran for his video using a 5 gallon water jug. We decided to go even smaller for a school experiment and use a 2 liter Soda bottle.
 |
| Jacquelyn with her functioning system. |
 |
| Preparing for the video - materials we used listed below. |
2 liter soda bottle - cap and label removed
3 paint stir sticks (free from Home depot and re-used)
zip ties
Crop-a-dile hole punch - a dremel or a drill would work for the stir sticks hole punch is plenty for the bottle
Plastic cap from a bottle of salad dressing - with several holes drilled into it - we made many more holes than the ones shown in the video as the system didn't drain fast enough to prevent overflow - after additional holes it was perfect. (Initially we used a hammer and a nail to make the holes but I found my dremel and it went much smoother - although a hammer and nail work)
Small fountain water pump
aquarium tubing
aquarium gravel - I found out later that the kind we used may raise the PH level and harm plant growth - clay pellets or regular small gravel may be better.
Black spray paint - Jacquelyn explains why in the video
duct tape - can be any color - again - Jacquelyn explains it in the video.
scissors to cut the bottle
Hot glue gun to attach the salad dressing cap inside the bottle top for drainage in the plant area
T-square if you want the holes to be perfect. (We used it on the first stick - then we used a white charcoal pencil to mark the rest from the first one used as a template.)
I think that was it - if you have questions just ask and we will try to answer them.
Enjoy your day! K
Thursday, May 21, 2015
Another beautiful cool day here in Upstate NY
I took a walk out in my apple field today and recorded a short video - you can see the video on YouTube at: http://youtu.be/TV2pJZvrqGA
These are a few additional pictures from today.
Another episode in my day today was to wander over to the rhubarb patch and cut some stalks to make some Strawberry Rhubarb jam. I didn't make a whole lot - but it will be very delicious on whatever we decide to eat it with. (It looks beautiful too - which is always a bonus with food - isn't it?)
I hope you enjoyed today's foray into my landscape and then into the kitchen to play a little. I've enjoyed showing you around. I hope you have a blessed day - thank you for stopping by.
K
These are a few additional pictures from today.
 |
| The iris' are coming into bloom and are so stately! |
 |
| The pink lilacs are getting very full and smell so wonderful! |
 |
| This is a bird house that my dad built a long time ago - I'd say it's withstood the test of time - it's been on that fence post at the entrance to the field since around 1995. |
 |
| Cleaned and cut Rhubarb and Strawberries with a little lemon juice in the pot ready to stew. |
 |
| Starting the cooking process - the fruit begins to give off it's juice. |
 |
| Add the sugar - this is a little blurry - must be sugar shock. Continue to cook and melt the sugar. |
 |
| Ah, cooking nicely - starting to bubble and the sugar is melted! |
 |
| As it bubbles it begins to foam a little - this needs to be skimmed off with the spoon. |
 |
| Result of skimming the foam - discard it. |
 |
| beautiful red color - almost ready. |
 |
| This part is just me - the jam is ready to put in a jar at the last photo. I like to add a little nutmeg, cinnamon, and some of my homemade vanilla - kicks up the flavor even more. |
 |
| Here is the final product - in a jar and ready for the refrigerator until we get ready to eat it up. *The portion I prepared made a little more than this one jar - just enough this time that I won't need to do the canning process. (YAY!) |
K
Wednesday, May 20, 2015
Rock garden is started - I have a lot of gardens - too many? Nah....
It is cool today and overcast. I took the opportunity to start to clean out the Rock Garden. I think I've touched all of my growing areas now - I haven't completed them all - but they are started - weeding and clearing out anyway. Most of them have been around here as long as I have been. Here is a picture of the started work on the Rock Garden - this is after about 5 wheel barrels full of weed, leaf and just junk plant removal.
I thought it was supposed to rain today - it misted a little but I'm still waiting - as are my plants. I don't want to water if it rains - but it's been so dry that I need to water if it doesn't rain - what a dilemma.
I want to get some more lavender for the front garden and the rock garden. I also need some rosemary and thyme. I used to have these in quantity but they've all died out now. I'm trying to think of a portable herb garden arrangement that could come inside in the colder months, but I'm not sure how that would work. In the winter my sunroom is already full of house plants that spend the warmer months in residence on the deck.
The one task that I haven't done this year (as far as growing stuff goes) is the weed whacking. (Gotta love the term...) I have a re-chargeable battery operated one that also has an electrical port. I really like it because it's Ryobi and fairly light. I was going to do some of it today but my back is not very happy right now - so I guess it will wait until tomorrow.
Pretty soon I may start my craft work back up and my blogs will contain doll and paper craft content again. It's hard to work inside in the short spring/summer months in upstate NY - the nice weather season is so short and even then - mowing grass never seems to end. (Not my favorite part of summer.)
So until next time - be safe and be happy. K
 |
| Left end of garden by Garage. |
 |
| Middle and right end going toward the deck and the other rock wall garden shown in the picture below. |
 |
| This is my supervising help - Wally. He's been doing a very good job inspecting my work. He's checking out the fire bowl now. (You never know where you might find a snake.) |
 |
| This is spicy oregano and sage - the beginning of a herb garden. They may go in a pallet garden - not sure. |
I want to get some more lavender for the front garden and the rock garden. I also need some rosemary and thyme. I used to have these in quantity but they've all died out now. I'm trying to think of a portable herb garden arrangement that could come inside in the colder months, but I'm not sure how that would work. In the winter my sunroom is already full of house plants that spend the warmer months in residence on the deck.
The one task that I haven't done this year (as far as growing stuff goes) is the weed whacking. (Gotta love the term...) I have a re-chargeable battery operated one that also has an electrical port. I really like it because it's Ryobi and fairly light. I was going to do some of it today but my back is not very happy right now - so I guess it will wait until tomorrow.
Pretty soon I may start my craft work back up and my blogs will contain doll and paper craft content again. It's hard to work inside in the short spring/summer months in upstate NY - the nice weather season is so short and even then - mowing grass never seems to end. (Not my favorite part of summer.)
So until next time - be safe and be happy. K
Subscribe to:
Posts (Atom)