This is the journal that I just received from Arlene today. I love it - this swap was a great experience - can't wait to join others.
Thanks for stopping by.
Have a color full day!
Kelly

Crafts of many colors all vivid to my mind. A very joyous place. * Art Dolls, cross stitching, polymer clay, beads, crochet - lots of colorful fun.
Friday, February 26, 2016
Alcohol Ink and a plastic egg
I saw this in a Tim Holtz video and had to try it - so easy and yet so very beautiful! Who wouldn't want a basket full of these?
Thanks for stopping by and have a color-full day!
Kelly
Thanks for stopping by and have a color-full day!
Kelly
Thursday, February 25, 2016
Alcohol Ink Alcohol and a Plastic envelope
More fun in my craft room today. Alcohol ink can be really messy - but it's loads of fun.
Hope you have a very Color-Full day!
Blessings,
Kelly
Hope you have a very Color-Full day!
Blessings,
Kelly
Sunday, February 21, 2016
Wedding Card share
This is a very special card that I made for a dear friend and her husband for their wedding. There is a Heartfelt Creations Cross die cut on the front of the card - but the rest is all computer printed and lace trimmed. I hope you enjoy this project share!
Have a blessed and color-full day!
Big Hugs,
Kelly
Have a blessed and color-full day!
Big Hugs,
Kelly
Friday, February 19, 2016
Flip Fold Card Mini using the Sugar Hollow bungalow set from Heartfelt Creations - Design team entry #3
Hi again - welcome back to my craft room. I have been working on a very cute flip fold card using the sugar Hollow Bungalow set that I just received.

This was a very fun project. I had been watching videos by Cat Hand on YouTube that showed Dendritic Monoprinting. She used glass sheets which I'm not a fan of - so instead I tried it using two plastic loose leaf binder dividers - it worked so - yay!

I have a video tutorial available on YouTube if you want to see the tag making process:
https://youtu.be/Miq9cbVbGSc
Materials List for the card and tag:
Heartfelt Creations:
Stamps: Sugar Hollow Bungalow (HCPC-3718), You're A Hoot (HCPC-3715),
Dies: sugar Hollow bungalow (HCDI-786), Eyelet Oval (HCDI-776)
* I also used left over embellishments from my previous project - Brag Book Mini from the Birds and Blooms collection:
Stamps: Birds and Blooms (HCPC-3644), Leafy Branch (HCPC-3645)
Dies: Birds and Blooms (HCDI-756), Leafy Branch (HCDI-757)
Paper for Card: Classic Sunflower Collection (HCDPI-247)
Miscellaneous:
Art Institute Dries clear glue
Washi Tape of choice (mine is birds and cages images)
Matte Mod-Podge (to seal the Washi)
1 piece of 8.5 by 11 inch brown cardstock
1 piece of "feather/leaf" design paper - from my stash - whatever appeals to you
Printer paper for the Dendritic technique
Acrylic Paints: (I used) White, Copper and Coffee Bean
White card stock scrap for the What's Up? embellishment
Momento Ink: Tuxedo Black for owl stamping and Rich Cocoa
Gel pens
Derwent Inktense Pencils
Black Micron Pen 01
To create the tag please see my tutorial on my YouTube channel linked above.
To create the flip fold card:
I used a sheet of the Classic Sunflower Collection paper (one side is divided into four / six inch sections) Cut the sections apart to use as pages. (You will only need three.)
Lay the pages out in a line in an order that appeals to you. The first page will have the tag taped to the right hand front side as a "flip out" section.
Leave about 1/8th of an inch between each page to allow for the pages to move easily. Decide if the pages as they lay on the table are the inside or the outside of your card. Connect each page to the next using the Washi Tape. Cut the tape flush with the ends of the pages. Coat each Washi strip with a layer of Matte Mod-Podge to keep the Washi from peeling up. (it's low tack).
Flip the connected pages over and do the same thing - keep track of top and bottom if your Washi Tape is directional. Do the same thing to this side - Washi Tape the connection of the pages and coat with Matte Mod-Podge.
Let dry or dry with heat gun taking care not to bubble the Mod-Podge.
This makes your card complete - all that's left is to decorate.
Using the tag created in the video tutorial. Cut it to match the size of the card as desired. Using Washi Tape connect the tag to the front-right hand side of your card. Coat the Washi on both sides of the connection as above.
All that's left is to decorate your card as desired. I leave that to you. This is a great place to put special photos or memories to share with someone special. I think I will make another one for a special friend who is getting married on Sunday using a wedding themed paper stack. The possibilities are endless...
I hope you've enjoyed this post and that you will come back and visit me soon. Have a wonderful and color-full day!
Kelly
Thursday, February 18, 2016
Mini Brag Book using the Birds and Blooms Collection from Heartfelt Crea...
Hello - Again!
This is a short project share video that corresponds to the blog post I published yesterday. The Birds and Blooms Collection is just so very beautiful. (Stay tuned because I used some of the embellishments left over from this mini on my third project which I will release tomorrow.)
Have a bright and color-full day!
Heartfelt Creations Feathery Peacock Tassel SHORT project share
This is a much shorter video that just showcases the completed book mark and Feathery Peacock Tassel that I went into great depth on in my last video. I hope you enjoy it - Have a very color-full day!
Kelly
Kelly
Book mark with Peacock Tassel - Featuring the Heartfelt Creations Peacock Paisley collection - Design team entry #2
Hello - I hope today finds you well and doing things that make you happy.

I've been working in my craft room which makes me very happy. Today I've made a book mark (or two) using the Feathery Peacock stamps and dies by Heartfelt Creations. I hope you like them - if you want to see a tutorial (rather long) about the creation of the tassel it's available here:
https://youtu.be/y6ASvgZ26To


Using the directions provided with your stabilizer, iron the fuse to the fabric, fabric side up.


I've been working in my craft room which makes me very happy. Today I've made a book mark (or two) using the Feathery Peacock stamps and dies by Heartfelt Creations. I hope you like them - if you want to see a tutorial (rather long) about the creation of the tassel it's available here:
https://youtu.be/y6ASvgZ26To
Materials List to make the book mark and Tassel:
Heartfelt Creations Peacock Paisley Collection:
Stamps: Feathery Peacock (HCPC-3661), Peacock Swirls (HCPC-3660),Daisy Flourish (HCPC-3658), Peacock Paisley (HCPC-3659)
Die: Peacock Paisley (HCDI-771)
Miscellaneous items:
140 pound watercolor paper
coloring media of your choice (I used acrylic paint for the book marks and Inktense Pencils and Gelli Roll pens for the peacocks)
Momento Tuxedo Black stamp ink
Martha Stewart Living Glitter Specialty Finish in Icecap White #442 843
Beads, bead caps, bling,
fibers (embroidery floss, yarn, wool, thread, string, etc)
Needle
Thread
Cotton Fabric
Pellon 808 craft fuse or stabilizer of your choice
Iron
3by5" index card or piece of cardboard to size to wrap fibers for tassel
To make the tassels you need fabric and iron on stabilizer along with the stamp and die (or scissors) of your choice.


Using the directions provided with your stabilizer, iron the fuse to the fabric, fabric side up.


Stamp the images on the fabric side of the stack and then iron with a dry iron/no steam to set the ink.
At this point I roughly cut the images to fit on the die plate for cutting.

*I use Washi tape to temporarily hold the die cutters in place over the image and then pass the plate through the machine as many times as necessary to obtain a clean cut. (The number of times will depend on your machine.)
Die cut all pieces and prepare to color. I use Derwent Inktense, a Sakura Water Brush, Kohl-I-Noor (woodless colored pencils), Sakura Gelli Roll pens. You may use any options you wish. Acrylic paint and water colors will also work. For the Feathery Peacock I also outlined some of the bolder lines with a black micron pen.
NOTE: Some of the stamp ink may run - it's all fixable - just keep working it.
On to the tassel - (link to the video on my YouTube channel provided above.)

Choose fibers and beads and embellishments of your choice. I used a section of 3 X 5 index card to wind my fibers around to create the tassel. Top it with whatever you choose, sew on the Peacock, embellish everything and you've got one gorgeous tassel.
Book marks are 140 pound Watercolor paper. Background painted with acrylic paints and after dry; stamped with the Feathery Peacock (HCPC-3661) stamp. The back is treated pretty much the same way but stamped with an assortment of the stamps mentioned in the materials list above. I then colored and painted various parts of the stamped images.
Finally, I laminated the completed book mark using a book mark sheath and the Purple Cow hot/cold 9 inch Laminator (3016C)
I hope that you enjoyed this project and if you make one I hope that you will share it with me.
Thank you for spending time with me - I hope you have a very color-full day!
Kelly
Wednesday, February 17, 2016
Heartfelt Creations Design Team Entries! Project #1 Brag Book Mini
Hello! I hope you are blooming today! This is my first response to a design team call - ever! I hope you like these projects - I know I loved making them and I always enjoy working with the Heartfelt Creations products. Beautiful!


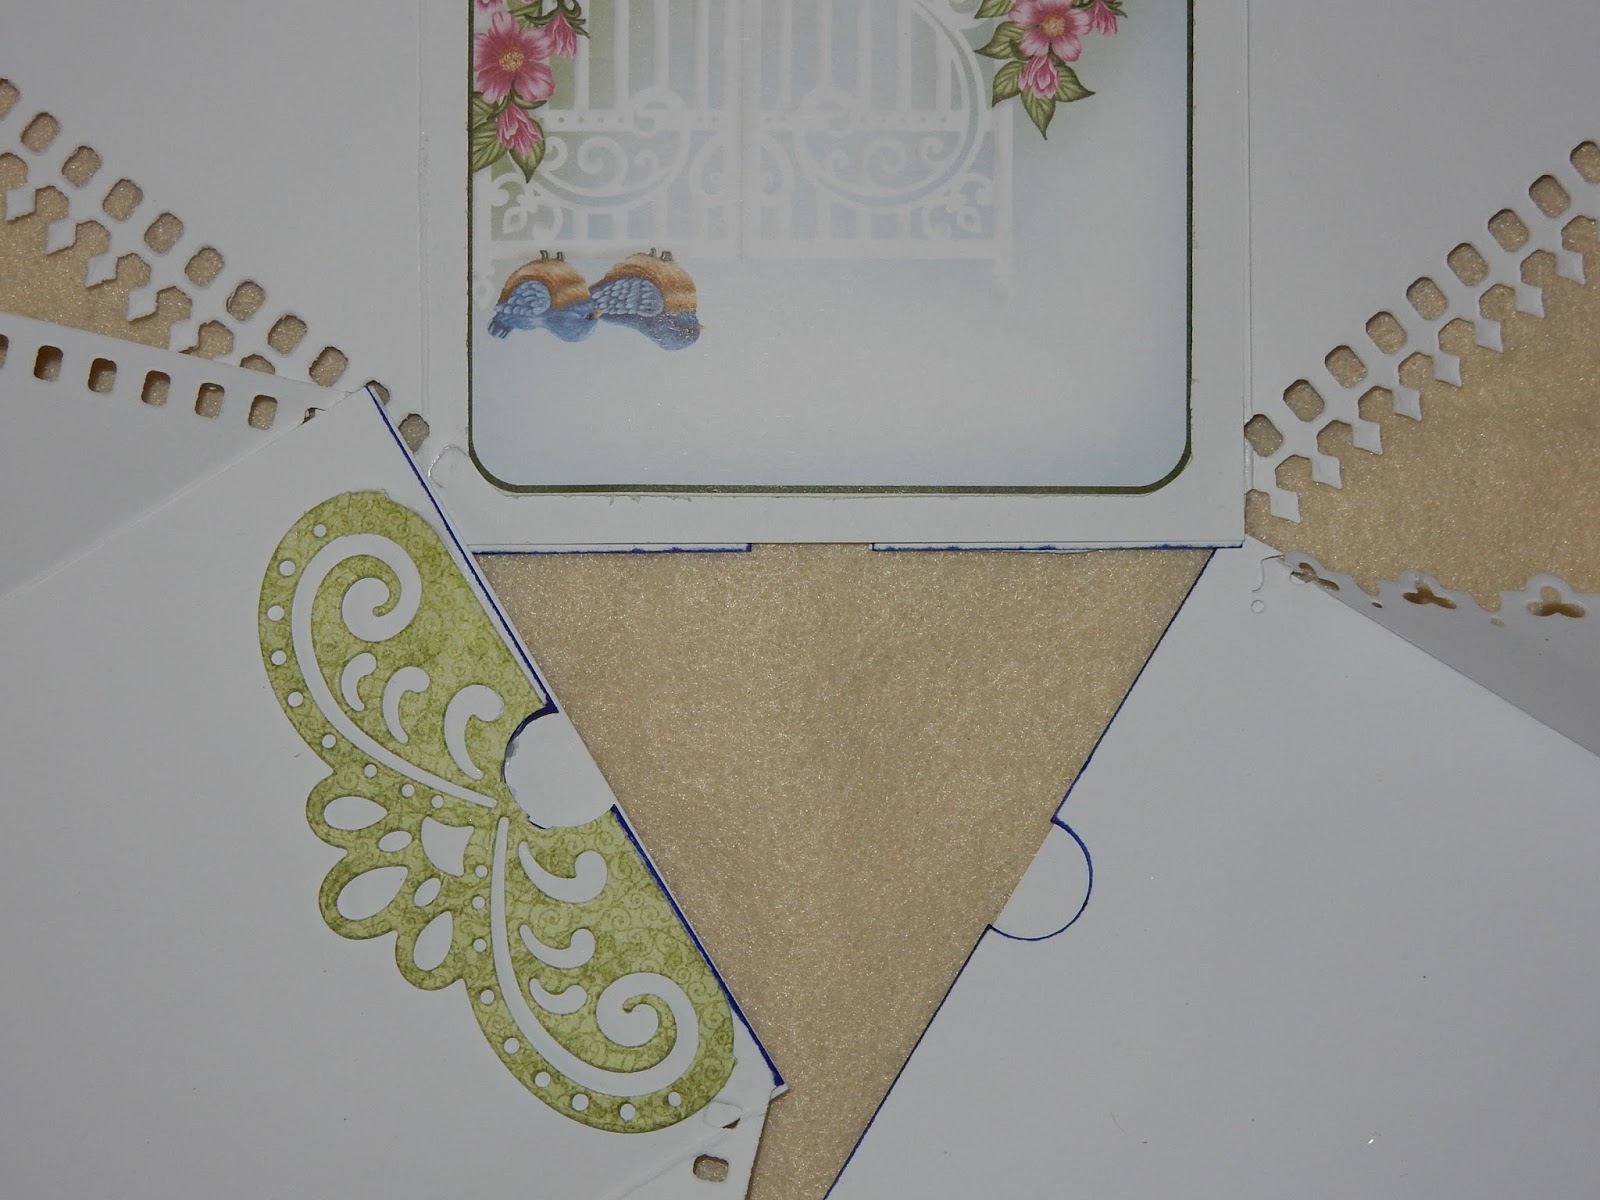
At this point, decide how you want your flaps for the pages to look. You may die cut them as I have or not - these could be left as is for additional pages, pieces may be added for fold outs or tucks, pockets - or they can just be folded to create the diagonal. One of the sides will be used to secure the binding for creating the album. In this case I chose to die cut the corners using the border Essentials dies (HCDI-783). Each page requires two strips and alternate sides of these two strips are cut or folded, etc. for flaps. The cut for each is made from the top of the center fold out to the bottom outside corresponding corner -


*On one of the strips (to be used as the back of the pocket page) use the 1/2 inch circle punch - or as desired, punch a half circle to create a "thumb hole" opening to ease access to pocket contents.


Glue on three sides creating a pocket on the back of the album by overlapping the pieces as indicated above. I chose to decorate where my papers joined below the die cut with ribbon from my stash.


I glued the ribbon ends on the inside of the cover and then covered the ends using the same tape that I used to reinforce the binding section.

The bound pages will fit in the middle section of the cover allowing the end 4.25 inch page to fall about .25 inch short of the "back" section.

Cover the inside of the album with your choice of papers.

Note the section with the flaps. This will now be covered by gluing a 5.5 by 5.5 Inch piece of covered card stock to the flap areas.


Now attach the pages to the binding flaps by gluing one flap to the top hinge piece on each tab. NOTE: Leave the bottom tab free from glue - only attach the page to the top .5 inch section. Then, using the adhesive of your choice, glue the bound pages into the center section of the cover closest to the left hand side so that the pages have room to lay to the right.


Build a dimensional pocket for the left (front) side of your cover. Cut three one inch strips that are less than the height of the card you want to use for a pocket front. I used one of the cut outs from the paper collection and backed it with the same size white card stock. I also used the same half inch circle punch to create a "thumb hole" access point on the pocket front.
 Score each of the 1 inch strips in half and cut an inward angle at the top to allow tags to slide in easily. Put glue on one side of the scored strips and attach one to each side and the bottom of your pocket front.
Proceed to put glue on the bottom side of the strips that are now attached to your pocket front and center it on the tab at at the end of your bound section facing the end pocket that you built from the flipfold piece.

Decorate the opposite side tab in whatever manner you like. I used part of a scrap piece of design paper and the fussy cut some of the leaves out and glued the whole piece over the tab end.

I finished the open pocket end of my cover by trimming around the edge with another piece of the pink ribbon from my stash. I also used another piece of card stock strip, scored in half as a stopper at the inside bottom edge of this pocket flap so that extra photos could be held inside.
To close the album you take the flat end of the cover and slide it inside the open pocket end, thus securely fastening your mini brag book cover.
 Proceed to decorate the outside of your book in any way that you see fit. I used the die cut embellishments from the Birds and Blooms Collection to finish mine off.
There is lots of room for photos, tags, pretty much whatever you care to save.


Thank you for spending time with me - I know this was a lllloooonnnnnngggggg one. I hope you enjoyed it and if you try it - let me know!
Have a lovely and creative day!
Kelly
Project #1:
Brag Book Mini -

Products Used:
Heartfelt creations:
Birds and Blooms paper collection (HCDPI-250)
Cover: Pocket and Flipfold Inserts C- White (HCFPI-435-2) 5.5 inch by 11.75 inch and 7.5 inch by 13.5 inch pieces
Birds and Blooms Card Kit - bits and pieces - (HCCKI-356)
Birds and Blooms Card Kit - bits and pieces - (HCCKI-356)
Stamps: Birds and Blooms (HCPC-3644), Leafy Branch (HCPC-3645), fluffy Birdies (HCPC-3646)
Dies: Birds and Blooms (HCDI-756), Leafy Branch (HCDI-757), Regal Borders and Pockets (HCDI-779), Ornate Borders & Pockets (HCDI-780), Border Essentials (HCDI-783)
Other Materials: (use what you have and what you like!)
Paper:
Georgia Pacific white card-stock (Walmart)
Adhesive:
Art Glitter Designer Dries Clear glue
Coloring Media:
24 Inktense watersoluble Ink pencils
24 Kohl-I-Noor Woodless colour Pencils
Fine water brush - Kuretake Co. (Yellow)
Black liner pens: Sharpie, Inc permanent, Sakura Microperm 01
Various Gel pens - Gelly Roll
Faber-Castell PITT artist pens - dark sepia and green
Inks:
Momento Luxe: Toffee Crunch and Rhubarb Stalk
Whispers Archival dye Based Ink - Savoy Green
Pink Ribbon and miscellaneous ephemera from my stash
Tools: (use what you are comfortable with!)
Trimmer or Scissors and ruler
Scissors
Ruler
Foam Matt (I used doubled craft foam for shaping my die cuts)
Stylus tools with various size balls
Score board or ruler and stylus
Die cut machine
Bone folder
pokey tool
Stamping blocks
Marvy 1/2 inch hole punch
***Binding system used was developed by Kathy Orta-King. This system is patent pending and she allows it's use as long as she receives full credit for it's creation - hats off to Kathy.
Whew - lets get to it!
Please Read All Information First BEFORE attempting.
The base and binding are created using 8.5 by 11 inch sheets of Georgia Pacific White Card-Stock, found at Walmart's. I've created this mini with 5 pages - 10 sides total. You will notice that the page construction is basically a criss-cross card design. (This allows for a pocket and a tuck spot on the reverse of each page.) One sheet of card-stock is used per page. A strip is left that you can use for tags, to create some embellishments, or cut down further for Artist Trading Cards if you like! Imagine the possibilities!
* Using your trimmer or scissors and ruler, measure your card-stock to cut at 4.25 inches across the 8.5 inch width. You need two 4.25 inch strips for each page. This mini requires 10 strips for five pages. (You can make however many pages you like.)


* Score each 4.25 inch by 8.5 inch piece of card-stock at the 4.25 inch mark (in half). Now each sheet is comprised of two 4.25 inch squares. (The two strips will be overlapped to create a tri-fold strip later.)


At this point, decide how you want your flaps for the pages to look. You may die cut them as I have or not - these could be left as is for additional pages, pieces may be added for fold outs or tucks, pockets - or they can just be folded to create the diagonal. One of the sides will be used to secure the binding for creating the album. In this case I chose to die cut the corners using the border Essentials dies (HCDI-783). Each page requires two strips and alternate sides of these two strips are cut or folded, etc. for flaps. The cut for each is made from the top of the center fold out to the bottom outside corresponding corner -


*On one of the strips (to be used as the back of the pocket page) use the 1/2 inch circle punch - or as desired, punch a half circle to create a "thumb hole" opening to ease access to pocket contents.

*Should you wish to do any page inking this is a good time to do it - before gluing.
*Creating the pocket pages:
With two pieces of your card-stock strips (4.25 by 8.50) - Take one strip and using wet glue or Adhesive of choice - place adhesive around three edges - leaving the top edge open. (You may choose to leave a side open instead but you will need to do your punching of the thumb hole to match the open side.) Do this for each group of two until all of your pages are together.


NOTE: The binding will be added to the bottom edge using a flap to secure it.
You should now have separate pages that look like this:
*Decorate as desired. I used the Birds and Blooms Collection (HCDPI-250) along with the stamps and dies shown in the materials list. I always make up a bunch of embellishments before I begin and then "play" as I go. (You may decorate the pages now being careful to avoid the flap that will be a pocket hinge - or you can do as I do and wait until the mini has been bound.) I do start making the embellishments before the pages have been bound.


Momento Luxe Toffee Crunch ink was used to stamp the birds and branches to achieve a no-line coloring look. the flowers were stamped using Momento Luxe - Rhubarb Stalk ink and the leaves were stamped using whispers - Savoy Green ink.
Color was added to the images using a variety of coloring media and techniques. The products used are shown in the list at the beginning of the project.
More information and a brilliant tutorial on flower shaping (also can be used for the leaves, branches and birds) can be found on the Heartfelt Creations Website. Emma Lou walks you right through it.
The front of the pages are based using some of the centers from the card pages in the paper collection (HCDPI-250)

The back of the center page: different Ornate border Die cuts were glued at the top of the pocket and around the "thumb hole". (Hint: This can be used as a tuck to help hold any photos or items that are placed in the pocket formed by gluing the base of a side flap to the hinge system.)


Binding the mini:
The newest (that I've seen) of Kathy Orta-King's binding method has been used in this mini. It takes the original hidden hinge system and adds a half inch extension to the piece that attaches the pages giving each page more room for manipulation and facilitates ease of use even with heavy decoration. Thanks again Kathy!
* This mini was bound using two connected strips of card-stock; one measuring 4 inches wide by 11 inches long and the other 4 inches wide by 5.5 inches long. These two strips are over lapped by .5 inch and glued together using whatever adhesive you are using. It's the typical accordion pleating - mountain fold, valley fold, mountain fold, etc.


Place your 4 by 11 inch strip on your score board with one 11 inch edge along the top. Do the same for your 4 by 5.5 inch strip. (You may use a ruler and pencil if you don't have a scoreboard.)
Make your first score at 1.5 inches then score every .5 inch until you reach the end of the 11 inch strip. Then do the same with your 4 by 5.5 inch strip but leave the last 1.5 inches of this strip without scoring so that it can be used as a tab to attach to the cover. The 1.5 inch tabs will attach to the cover and hold the binding in place.


Fold on all of your score lines to ensure ease of movement. On the backside of your strip add adhesive to your folds as follows - do not get adhesive into the scored lines.
Connect the two strips together at the .5 inch overlap.

Read all of these directions first:
GLUING:
Skip the 1.5 inch tab and the next .5 inch section. Put glue in the next two .5 inch sections - again - avoid the scored lines, skip the next three .5 inch sections and glue into the next two, repeat until the last 2 inches of this strip is left. The next .5 inch space is for the gusset between the last page and the tab for the cover. The final 1.5 inches is the tab to connect to the cover - do not put any glue on the tabs yet.
NOTE: I fold my two glued sections to my next two unglued sections as I go so that the glue doesn't get everywhere - each of these glued sections will fold freely in the center and create one hinge. You will need one hinge section for every page you create. The third non-glued section is a gusset between your pages.


When all sections are glued and folded your binding section is about 6 inches long. I use a type of packing tape to reinforce it and give added strength. The pages will be attached to the top most section of each hinge.
Creating the cover:
Using the two Flipfold pieces from the list (HCFPI-435-2) make a cover to enclose your binding piece. One piece will overlap the other as shown in the photo. Before connecting cover both pieces on the outside with your choice of paper. I used papers from the Birds and Blooms paper collection (HCDPI-250).


You can die cut or punch a design on the opposite end of the piece with the flaps. I chose to use one of the Regal Borders and Pockets dies (HCDI-779)

Glue on three sides creating a pocket on the back of the album by overlapping the pieces as indicated above. I chose to decorate where my papers joined below the die cut with ribbon from my stash.


I glued the ribbon ends on the inside of the cover and then covered the ends using the same tape that I used to reinforce the binding section.

The bound pages will fit in the middle section of the cover allowing the end 4.25 inch page to fall about .25 inch short of the "back" section.

Cover the inside of the album with your choice of papers.

Note the section with the flaps. This will now be covered by gluing a 5.5 by 5.5 Inch piece of covered card stock to the flap areas.


Now attach the pages to the binding flaps by gluing one flap to the top hinge piece on each tab. NOTE: Leave the bottom tab free from glue - only attach the page to the top .5 inch section. Then, using the adhesive of your choice, glue the bound pages into the center section of the cover closest to the left hand side so that the pages have room to lay to the right.


Build a dimensional pocket for the left (front) side of your cover. Cut three one inch strips that are less than the height of the card you want to use for a pocket front. I used one of the cut outs from the paper collection and backed it with the same size white card stock. I also used the same half inch circle punch to create a "thumb hole" access point on the pocket front.

Proceed to put glue on the bottom side of the strips that are now attached to your pocket front and center it on the tab at at the end of your bound section facing the end pocket that you built from the flipfold piece.

Decorate the opposite side tab in whatever manner you like. I used part of a scrap piece of design paper and the fussy cut some of the leaves out and glued the whole piece over the tab end.

I finished the open pocket end of my cover by trimming around the edge with another piece of the pink ribbon from my stash. I also used another piece of card stock strip, scored in half as a stopper at the inside bottom edge of this pocket flap so that extra photos could be held inside.
To close the album you take the flat end of the cover and slide it inside the open pocket end, thus securely fastening your mini brag book cover.

There is lots of room for photos, tags, pretty much whatever you care to save.


Thank you for spending time with me - I know this was a lllloooonnnnnngggggg one. I hope you enjoyed it and if you try it - let me know!
Have a lovely and creative day!
Kelly
Subscribe to:
Posts (Atom)