Tuesday, May 26, 2015

Jacquelyn's Aquaponics project -

Good morning!  I hope this finds you well and doing what you enjoy.  My granddaughter, Jacquelyn, came over this weekend and among other things, we worked on an aquaponics system for a school project.  This project stems from one of our visits to Disney World where we went on the "Behind the Seeds" tour and saw first hand how Disney portrays "Living with the Land".  It is fascinating and I highly recommend it - so very inspiring - especially to young minds.  Anyway - here are a few photos and I uploaded a video of the experiment to my Kelly Bell YouTube channel.

https://www.youtube.com/watch?v=fO_3X_VUlxE&feature=player_detailpage

I hope this brings you to it if you would like to see the process we followed.  Our thanks to Vinil Ratnakaran for his video using a 5 gallon water jug.  We decided to go even smaller for a school experiment and use a 2 liter Soda bottle.

Jacquelyn with her functioning system.

Preparing for the video - materials we used listed below.
materials:

2 liter soda bottle - cap and label removed
3 paint stir sticks (free from Home depot and re-used)
zip ties
Crop-a-dile hole punch - a dremel or a drill would work for the stir sticks hole punch is plenty for the bottle
Plastic cap from a bottle of salad dressing - with several holes drilled into it - we made many more holes than the ones shown in the video as the system didn't drain fast enough to prevent overflow - after additional holes it was perfect. (Initially we used a hammer and a nail to make the holes but I found my dremel and it went much smoother - although a hammer and nail work)
Small fountain water pump
aquarium tubing
aquarium gravel - I found out later that the kind we used may raise the PH level and harm plant growth - clay pellets or regular small gravel may be better.
Black spray paint - Jacquelyn explains why in the video
duct tape - can be any color - again - Jacquelyn explains it in the video.
scissors to cut the bottle
Hot glue gun to attach the salad dressing cap inside the bottle top for drainage in the plant area
T-square if you want the holes to be perfect.  (We used it on the first stick - then we used a white charcoal pencil to mark the rest from the first one used as a template.)

I think that was it - if you have questions just ask and we will try to answer them.

Enjoy your day!  K

Thursday, May 21, 2015

Another beautiful cool day here in Upstate NY

I took a walk out in my apple field today and recorded a short video - you can see the video on YouTube at: http://youtu.be/TV2pJZvrqGA

These are a few additional pictures from today.

The iris' are coming into bloom and are so stately!

The pink lilacs are getting very full
and smell so wonderful!

This is a bird house that my dad built
a long time ago - I'd say it's withstood the test
of time - it's been on that fence post at the
entrance to the field since around 1995.
Another episode in my day today was to wander over to the rhubarb patch and cut some stalks to make some Strawberry Rhubarb jam.  I didn't make a whole lot - but it will be very delicious on whatever we decide to eat it with.  (It looks beautiful too - which is always a bonus with food - isn't it?)

Cleaned and cut Rhubarb and Strawberries with a little lemon
juice in the pot ready to stew.
Starting the cooking process - the fruit begins to give off it's juice.
Add the sugar - this is a little blurry - must be sugar shock.
Continue to cook and melt the sugar.
Ah, cooking nicely - starting to bubble and the sugar is melted!
As it bubbles it begins to foam a little - this needs to be skimmed
off with the spoon.
Result of skimming the foam - discard it.
beautiful red color - almost ready.
This part is just me - the jam is ready to put in a jar at the last photo.
I like to add a little nutmeg, cinnamon, and some of my homemade
vanilla - kicks up the flavor even more.
Here is the final product - in a jar and ready for the refrigerator until
we get ready to eat it up.  *The portion I prepared made a little more than
this one jar - just enough this time that I won't need to do the canning
process.  (YAY!)
I hope you enjoyed today's foray into my landscape and then into the kitchen to play a little.  I've enjoyed showing you around.  I hope you have a blessed day - thank you for stopping by.

K

Wednesday, May 20, 2015

Rock garden is started - I have a lot of gardens - too many? Nah....

It is cool today and overcast.  I took the opportunity to start to clean out the Rock Garden.  I think I've touched all of my growing areas now - I haven't completed them all - but they are started - weeding and clearing out anyway.  Most of them have been around here as long as I have been.  Here is a picture of the started work on the Rock Garden - this is after about 5 wheel barrels full of weed, leaf and just junk plant removal.
Left end of garden by Garage.

Middle and right end going toward the deck and the other
rock wall garden shown in the picture below.

This is my supervising help - Wally.  He's been doing a very good
job inspecting my work.  He's checking out the fire bowl now.
(You never know where you might find a snake.)

This is spicy oregano and sage - the beginning of a herb garden.
They may go in a pallet garden - not sure.
I thought it was supposed to rain today - it misted a little but I'm still waiting - as are my plants.  I don't want to water if it rains - but it's been so dry that I need to water if it doesn't rain - what a dilemma.  

I want to get some more lavender for the front garden and the rock garden.  I also need some rosemary and thyme.  I used to have these in quantity but they've all died out now.  I'm trying to think of a portable herb garden arrangement that could come inside in the colder months, but I'm not sure how that would work.  In the winter my sunroom is already full of house plants that spend the warmer months in residence on the deck.

The one task that I haven't done this year (as far as growing stuff goes) is the weed whacking.  (Gotta love the term...)  I have a re-chargeable battery operated one that also has an electrical port.  I really like it because it's Ryobi and fairly light.  I was going to do some of it today but my back is not very happy right now - so I guess it will wait until tomorrow.

Pretty soon I may start my craft work back up and my blogs will contain doll and paper craft content again.  It's hard to work inside in the short spring/summer months in upstate NY - the nice weather season is so short and even then - mowing grass never seems to end.  (Not my favorite part of summer.)

So until next time - be safe and be happy.  K

Tuesday, May 19, 2015

Mid-May and my eldest daughter's 38th birthday - where does the time go?

Wow - where does time go?  I've been retired about 13 months now and I can attest to the fact that I am not bored - I think the days have gotten shorter by half at least and I have twice as much to do.  I am loving it.  I just need to take the time to sit down and write about it - and do some video.  Life is good.

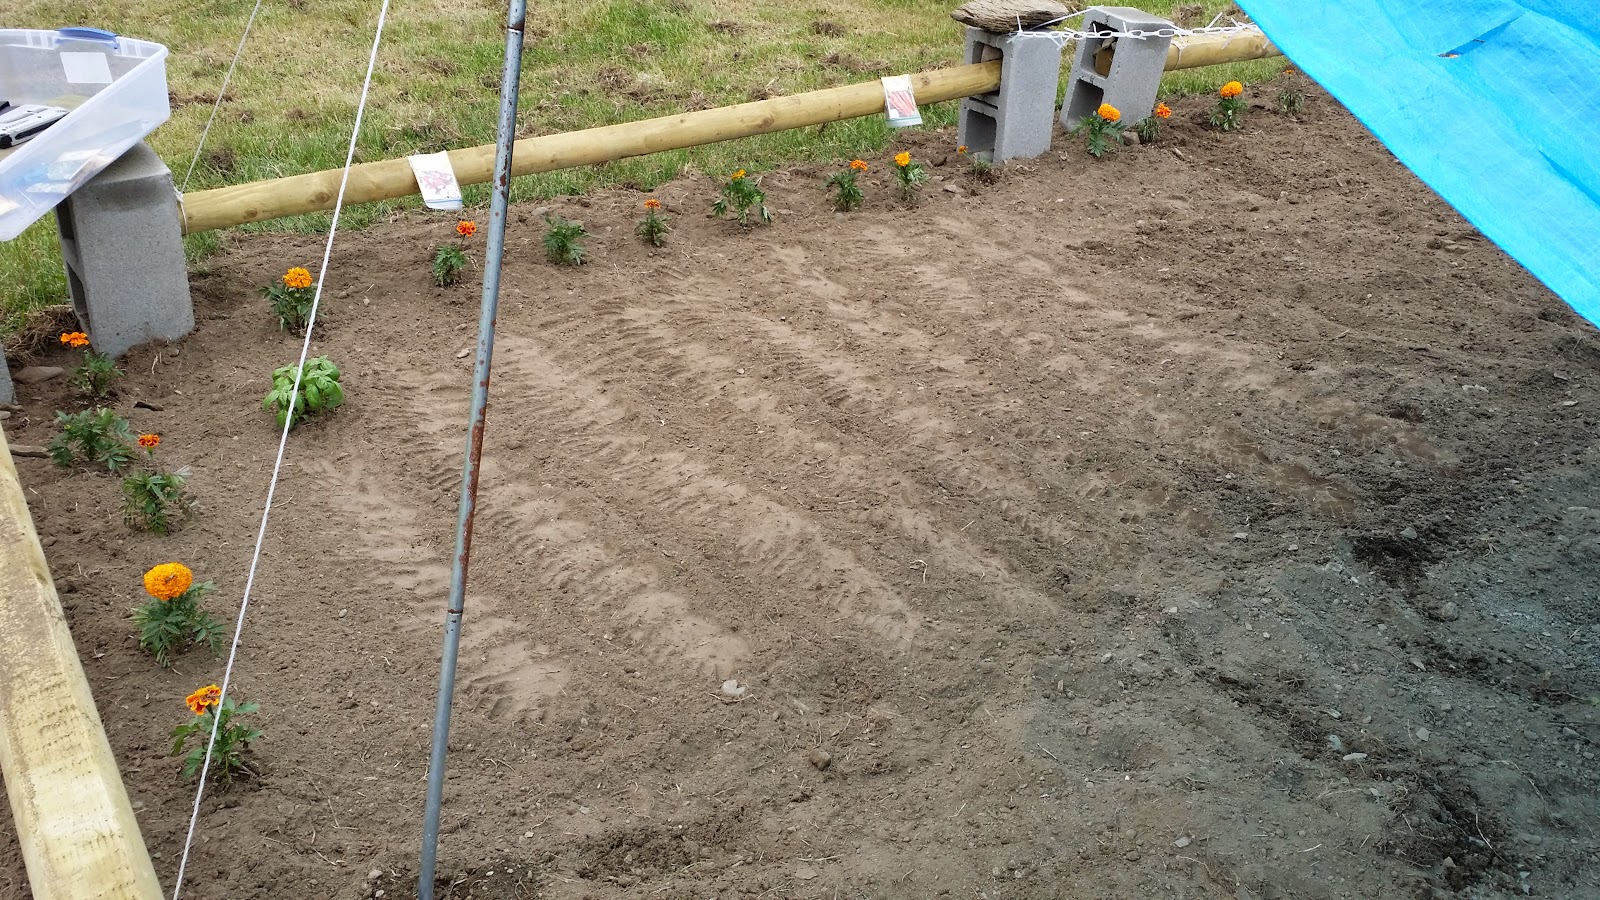
The first part of today I spent in the vegetable garden.  I am planting the same area that my late husband used to plant.  I'm doing it my way though.  I've created a boundary around the garden that I like a lot using cement blocks and landscape timbers.  I've also put up a makeshift pergola made up of a tarp and some tent poles for now.  Maybe by next year I will have the nerve to scavenge some lumbler and actually make a year round pergola for the garden.  It would be nice to grow peas and beans on while shading lettuce and other leafy greens.

I'm adding some photos that I took after I finished working in the garden.  This is a big blog post - lots of pictures to document some of the areas that I've been working on as well as the vegetable garden.  I have so many plans and ideas.  One of my new projects for this year will be to do some experimenting with Aquaponics and Hydroponics.  I bought some buckets to start out with and just need some PVC and aquarium pumps to get started.  Fun.
Marigolds, basil and seeds for radishes, carrots 
Hot Pepper plants and seeds for beets
View from the vegetable garden back to the house

Nasturtium seeds planted
Tomato plants, cucumber, yellow watermelon, yellow squash
and sunflowers
The undisrupted space to the right is Sunflower seed.
There will be three variety.  5-7 foot, 7 - 9 foot and 12 foot.
 
rock wall garden pink lilac
Peony garden
Iris and peony garden with a view
 back to house,
deck side.
This all takes a lot of time and labor.  I mow it and grow it.


Lily of the valley in front/right side of house

Wisteria in front of house
Birch stand at left side of house view
to vegetable garden.
Front Right of house.  Dwarf
bush, white snowball and lily of
the valley.


View back to field with
Apple Trees.  Red is a pole
barn and black "cannon"
are compost bins.
Another view of the Apple Orchard.

Left side of garage
facing the field.
Birch Stand showing
the shed.
White Lilacs by the Garage.
Rock wall garden with
hostas.
Bleeding hearts.
Another bleeding
heart by the garage.


A cute aside about my compost barrels.  I use the word "cannon" to describe them in the picture because last weekend when my 9 year old grand daughter came for a visit she asked her mother why Nana has cannons in her field? - LOL - (survival of the fittest...)

I bought a small 5'X7' green house to put up.  I am thinking of starting the aquaponics in it.  This is a new adventure for me.  I've enjoyed gardening but it's usually flowers - Ted was always the bulk veg gardener of the family.  We shall see what we shall see.  Thank you for taking the time to look at the objects of my endeavor.  If you have any comments or questions I would love to hear them.

Have a beautiful day and enjoy every nano second.
K


Monday, March 16, 2015

New YouTube video up - Altered Book Art Journal

Hi - I know it's been a while; but, I've been on vacation, celebrating my birthday and just generally being me.  (That takes a lot of time - sometimes.)

I've been working on an old book that I found - well, I'm not really sure where I found it - but it's become quite a project for altering.  This is what I call "messy Art" and it's right up my alley.  I am getting very gluey and paint smeared and loving every minute.  This project actually started at the end of 2014 and will most likely be a work in progress for much of 2015.  I didn't realize how much effort it takes to create an altered book!

The video I put up on YouTube only shows the progress I've made to date.  It may not look like much but believe me - it's been an effort.  The book, an old text book I think, had over 500 pages and I've whittled it down to about 20 two sided pages - lots of editing there.  The paper is on the thin side so I glued two pages together in each instance to form one stronger page.  I will be adding paper and ephemera as I go so the pages will get stronger - I'm just hoping that the binding holds up!

Here are a couple of pictures - one of the outside of the book - as yet unaltered and one of the middle spread that I did this morning.  Bare in mind that I am only beginning work on these pages - what you see is only the start of the background - not the finished background and the actual page layout isn't even in the idea stage yet.  Loads of fun - and I find it really exciting to just do this as I go - by the seat of my pants so to speak - no blue print or seat belts here.  LOL.

The front of the book - isn't the image interesting?  I think I may just emphasize it rather than cover it.

My phone lets me write on my photos - just thought it was cool.

Middle background spread in progress - scraps of paper, die cuts and gesso so far - options are endless...
I think this is the link to the video - I hope you enjoy it.

https://www.youtube.com/watch?v=Ph2xeAW7tio

I am planning to post videos showing my progress.  Don't forget to like my Facebook page to see photos of other projects that I'm working on.

https://www.facebook.com/cambridgegiftsbykelly?ref=hl
(if it's the first time you've visited my FB page - please don't forget to "like" it.


Thanks for joining me - K

Friday, February 6, 2015

Coloring paper blossoms today...

Hi - welcome back!  Glad you came over to take a look.  I have been busy creating paper Cherry Blossoms to embellish projects and I am very happy with how they came out.  I even made a YouTube video showing how I create them.  You can see the YouTube Video here:

https://www.youtube.com/watch?v=gy7jNoCGhQY&feature=youtu.be

I'm having a lot of fun lately!  I'm trying to use what I have - and since I've been crafting - collecting for many, many years - I have lots to use.  Probably for a few life-times.  This is a picture of my completed flowers - I really like them.  The paper changed a lot through the process and looks kind of Glassine - no longer like scrapbooking paper!
If you look at the YouTube video you will see a "mess" on my desk - I'm going back to do something with the paper butterflies I have cut out too - hmm, what will it be?

It's cold - still - outside today.  I think this has been one of the snowiest Februaries in a long time.  Wally and I will be going out to feed the birds in a little bit - at least I will go to fill the feeders and the suet cages - Wally will go out to chase the birds - he's fast but they fly faster.  He looks so confused - it's funny - I think he wants to fly too...

I hope your day is sunny and that you are happy.  Take care and be blessed - K


Wednesday, February 4, 2015

Polymer clay and wire wrapping - YAY!

I tried a new thing today, well - at least new for me.  I had a moon stone type, tear-drop shaped piece of polymer in my craft room and couldn't think of anything to do with it.  I was looking on Pintrest and saw a piece of wire wrapped polymer - and there were holes in the polymer with wire going through the holes!  Wow - the possibilities.  I have wrapped wire around polymer - not ever through it.

This meant getting out my tools.  I have a Dremel that I hadn't used in years and a dapping hammer - YAY!  I think I enjoyed this part more than the wrapping part to be honest.  So I drilled some holes, hammered a little wire and the photo below is the result.  It's not perfect, but I think for a first try it came out pretty good - and oh the possibilities!
Moonstone polymer in pink and black
I've been wanting to do a video on three of my dragon pieces - but my house is so loud in the winter!  I got a new oil furnace installed last November and the house is so loud it's hard to hear myself think.   The camera picks that sound up really well too.

The brown dragon guardian I've shared before there are two more that defend Dragon world too and I don't think I've shown them - at least not here.  There is a gray guardian and a purple guardian.  They are both defending a precious stone.  (Also made of polymer clay.)  The cabochon that the Purple Guardian is defending is also wire wrapped.
Gray Guardian
Back view showing wing and tail detail.
Other side - this really shows the leg detail.
Purple Guardian
Back view - highlights the wing and back detail
The Purple Guardian also holds a small pearl in his tail.
It's been really snowy and cold here again today - it is February though and both February and March tend to be the higher snow fall months here in the Cambridge Valley.  I hope that where ever you are this finds you happy, healthy and doing something that you enjoy.  Remember that every day may not always be good - but every day has it's good moments - cherish those you find.  K